After the LT is properly set up and targets, if needed, have been placed, it is time to create a new job to store all the captured measurements and associated data.
Click Add
Enter a Job Reference (typically a number).
Enter a Job Name.
Optionally enter a Job Description and Pickup Location.
Optionally select the Edge Styles to use if performing contract work.
Toggle On/Off Calibration Page
On: A calibration page will be created and used to set a plane.
Off: A drawing page will be created.
Click Add
If the Calibration Page toggle was On, LT3 will immediately being searching for the LT.
Ensure the 2-D lock is set by lining the two red dots on the top of the LT.
Click Continue
Perhaps the most important thing to remember is that once you take the first measurement to set the plane, and movement of the LT will result in inaccurate measurements.
YOU CANNOT MOVE THE LT AFTER THE FIRST MEASUREMENT
AND HAVE ACCURATE MEASUREMENTS!!!
All measurements from the laser and calculations of angular rotation rely on a constant origin point. This is commonly known as the 0,0 pronounced “zero – zero” point. Slightly kicking the tripod can result in inaccurate measurements. It is for this reason that positioning the LT and placing all targets are recommended before setting the plane that will be measured.
After the addition of a new job, the first step in capturing measurements will be to set the plane. This is the imaginary surface where all measurements will be transposed. Measurements captured above or below the plane will be lowered or raised to the same plane.
After the addition of a new job, the first step in capturing measurements will be to set the plane. This is the imaginary surface where all measurements will be transposed. Measurements captured above or below the plane will be lowered or raised onto this plane. It can also be thought of as the surface of stone that will be laid on the cabinets.
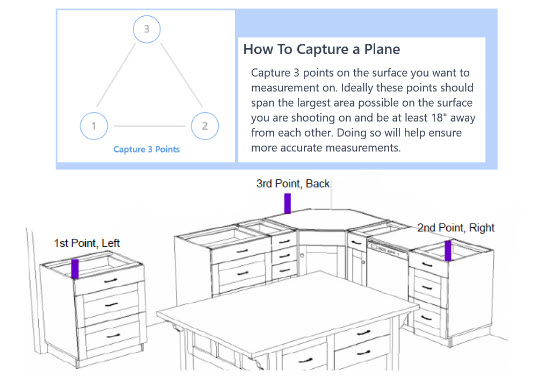
Setting a plane is accomplished by capturing three measurements prior to capturing the actual job.
Measurement 1 should be on the left of the job.
Measurement 2 should be on the right of the job.
Measurement 3 determines the orientation of the drawing and should almost always be further behind measurements 1 and 2. Imagine drawing an invisible line between measurements 1 and 2.
If measurement 3 is further away from the LT than the invisible line from measurements 1 and 2, the drawing will be orientated with the top of the job near the top of the tablet’s screen. This is recommended as it is easier to understand what you are measuring when it is in alignment with what you are seeing.
If measurement 3 is closer to the LT than the invisible line from measurements 1 and 2, the drawing will be orientated with the top of the job area near the bottom of the tablet’s screen. Furthermore, it will also flip the drawing resulting in the appearance that you are viewing the drawing from underneath the job.
Each of the three measurements must also be at least 18″ apart from each other or the LT may produce inaccurate measurements because the plane size is too small.
Instructions – Capturing (setting) a plane
Set three Pin Block Targets onto the surface that will be measured. This will normally be the top of the cabinet bases,
Position the Pin Block Targets vertically so that the shorter ends are resting on the top surface and the label is facing the LT.
The Pin Block Targets should be arranged in a triangle so that they are representative of the front left, front right, and rear center of the job.
Set the plane by capturing one measurement on each of the targets that were set up in the order below. 1. Front-left 2. Front-right 3. Rear-center